MacKeeper is a suite of software programs that can securely erase files, perform backups, and other utilities. Some users claim that it slows down their Mac, and many people who accidentally downloaded and installed it now want to remove it. It can also be a huge red flag as it can be the gateway for malicious software.
(Note: #3 is probably the best way to do this, though it takes longer!)
Here's how we get rid of MacKeeper:
Step 1. MacKeeper's Way
According to MacKeeper's website, the steps are simple: quit the app and drag it to the trash. If you're running an older version of MacKeeper, you may need to remove its menu bar icon first
- From the Apple menu, choose Go > Applications.
- In the window that appears, double-click the MacKeeper icon.
- From the MacKeeper menu choose Preferences.
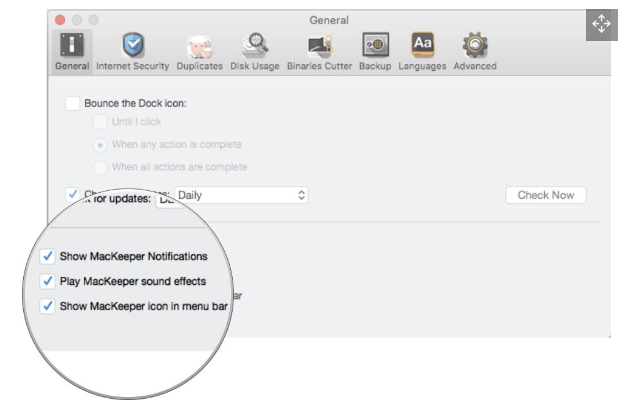
- In the window that appears, click General.
- Uncheck the box for Show MacKeeper icon in menu bar.
- From the MacKeeper menu choose Quit.
- Drag the MacKeeper app icon from the Applications window to the Trash.
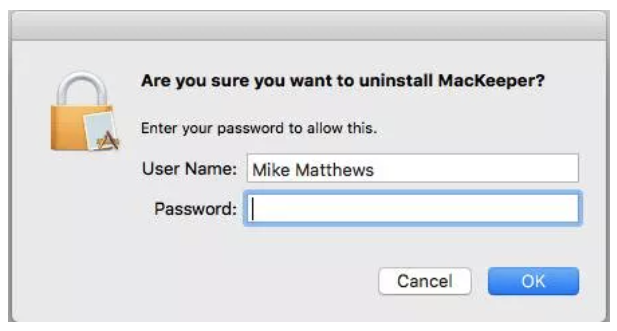
- Enter an administrator password twice when prompted.
Your Mac may open a web browser window for a MacKeeper survey that asks you to select a reason for uninstalling the software. It's purely optional.
Step 2. But you're not done yet...
Like just about every Mac app, MacKeeper spreads a bunch of support files in several different locations on your computer. Unfortunately, MacKeeper's uninstall does not remove all of them, particularly if you have an older installation of the app.
You can download and install Malwarebytes' Anti-Malware for Mac (opens in a new tab) and have it do the heavy lifting for you, or you can do it by hand as outlined in Step 3 below. If you choose to install Malwarebytes, launch it and do this:
- Click the Scan button.
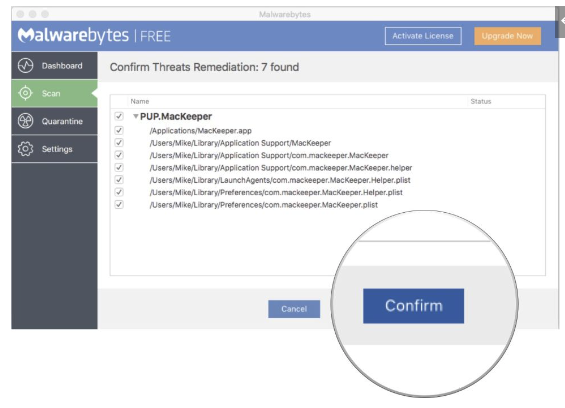
- In the sheet that appears, check the box for any software that you would like to delete and click Confirm. (As an aside, PUP stands for Potentially Unwanted Program.)
- Once the process is finished, restart your Mac.
If, at some point you want to remove Malwarebytes, there are directions (opens in new tab) at malwarebytes.com. You will probably also need to follow steps similar to those in Step 3 below to remove all the support files that Malwarebytes installs.
Step 3. The Manual Way (Most likely how we’ll do this!)
Even Malwarebytes may not get all of MacKeeper's supporting files. You should take a look in the Library folder in your home directory to make sure they're all gone. Here's where and how to find them.
- In the Finder's Go menu, choose Go to Folder....
- In the dialog box that appears, type ~/Library and click Go. This will open the Library folder which is normally hidden by default in your home directory.
- If you find a folder named MacKeeper Backups, drag it to the Trash.
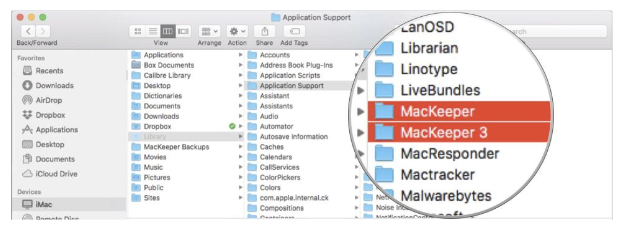
- Scroll through your Library folder and open the Application Support folder. If you find any files or folders with MacKeeper in its name, drag them to the Trash.
- Scroll through your Library folder and open the Caches folder. If you find files named com.mackeeper.MacKeeper, com.mackeeper.MacKeeper.Helper, or any other files or folders with MacKeeper in their name, drag them to the Trash.
- Scroll through your Library folder and open the LaunchAgents folder. If you find a file named com.mackeeper.MacKeeper.Helper.plist, or any other files or folders with MacKeeper in their name, drag them to the Trash.
- Your Library folder may contain a folder named LaunchDaemons. If you find inside it a file named com.mackeeper.MacKeeper.plugin.AntiTheft.daemon.plist or any other files or folders with MacKeeper in their name, drag them to the Trash.
- Scroll through your Library folder and open the Preferences folder. If you find inside it a file named com.mackeeper.MacKeeper.AdwareAnalyzer.plist or any other files or folders with MacKeeper in their name, drag them to the Trash.
- Scroll through your Library folder and open the Logs folder. If you find inside any file or folders with MacKeeper in their name, drag them to the Trash.
- From the Finder menu, choose Empty Trash... and Empty the Trash if prompted.
Step 4. Check Safari…even if it’s not the default browser!
Sometimes installing MacKeeper will result in Safari extensions and cookies also being installed, and the prodding to install MacKeeper—as well as other ads—may keep appearing. The latest version of macOS contains a built-in tool that will remove known unwanted adware and malware when you restart your Mac. So try that first. If that doesn't work, here's what to do.
- From the Apple menu, choose Force Quit....
- In the window that appears, select Safari and click Force Quit.
- Relaunch Safari while holding down the Shift key on the keyboard. This will prevent any windows that were open when you force quit Safari from reopening.
- From the Safari menu, choose Preferences.
- Click Extensions.
- In the list that appears, select any extensions that you don't recognize and click Uninstall for each of them.
- Click Privacy.
- Click Manage Website Data.
- In the sheet that appears, enter MacKeeper in the Search box to show any data related to MacKeeper and click Remove All.

- Close the Preferences window and from the Safari menu, choose Quit Safari and restart your Mac.
*Note: Best practice, whichever route you took to remove MacKeeper, is to restart your Mac. Be sure to check the that prompts about reopening all folders. Then double check no MacKeeper files appeared again.
Related articles
[ ... ]